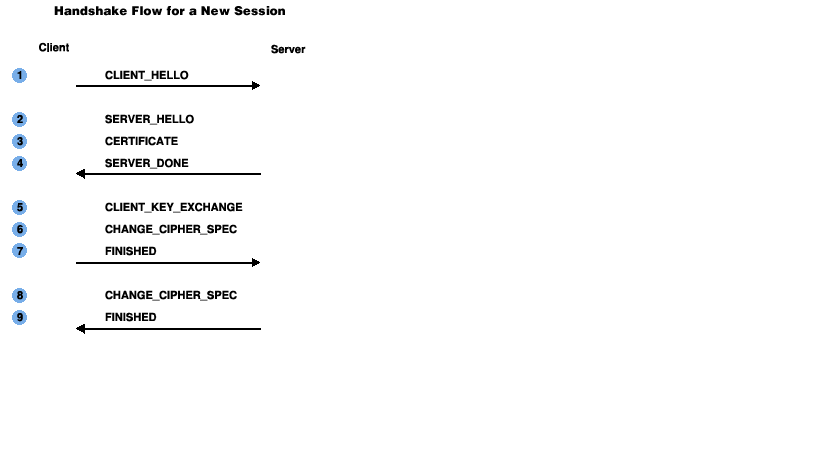
| | | The most common SSL handshake (SSL version 3 and TLS version 1 handshake flow for a new session) uses the Rivest-Shamir-Adelman (RSA) key exchange and authenticates the server only; the client is not authenticated. To reduce the number of packets that flow, multiple SSL records can be sent in a single packet. The sequence of commands that occur when messages are exchanged during an SSL handshake are summarized here: 1. The client sends a CLIENT_HELLO command to the server, which includes: · The highest SSL and TLS version supported by the client. · Ciphers supported by the client. The ciphers are listed in order of preference. · Data compression methods that are supported by the client. · The session ID. If the client is starting a new SSL session, the session ID is 0. · Random data that is generated by the client for use in the key generation process. SSL ciphers supported by your browser can be obtained from the following link, https://cc.dcsec.uni-hannover.de/ 2.The server sends a SERVER_HELLO command to the client, which includes: · The SSL or TLS version that will be used for the SSL session. · The cipher that will be used for the SSL session. · Data compression method that will be used for the SSL session. SSL Version 3 and TLS have no compression algorithms defined at this time. · The session ID for the SSL session. · Random data that is generated by the server for use in the key generation process. Execute the command "]# openssl ciphers" to get the list of ciphers provided by the server. 3. The server sends the CERTIFICATE command. This command includes the server's certificate and, optionally, a chain of certificates beginning with the certificate of the certificate authority (CA) that assigned the server's certificate 4. The server sends the SERVER_DONE command. This command indicates that the server has completed this phase of the SSL handshake. If client authentication will be performed, additional commands flow between the client and the server following the SERVER_DONE command. 5. The client sends the CLIENT_KEY_EXCHANGE command. This command contains the premaster secret that was created by the client and was then encrypted using the server's public key. Both the client and the server generate the symmetric encryption keys on their own using the premaster secret and the random data that is generated from the SERVER_HELLO and CLIENT_HELLO commands. 6.The client sends the CHANGE_CIPHER_SPEC command. This command indicates that the contents of subsequent SSL record data sent by the client during the SSL session will be encrypted. The 5-byte SSL record headers are never encrypted. 7.The client sends the FINISHED command. This command includes a digest of all the SSL handshake commands that have flowed between the client and the server up to this point. This command is sent to validate that none of the commands sent previously, which flow between the client and the server unencrypted, were altered in flight. 8.The server sends the CHANGE_CIPHER_SPEC command. This command indicates that all subsequent data sent by the server during the SSL session will be encrypted. 9.The server sends the FINISHED command. This command includes a digest of all the SSL handshake commands that have flowed between the server and the client up to this point. All the steps are diagrammatically represented in left.. Above details are taken from the URL: http://www-01.ibm.com/support/knowledgecenter/SSB23S_1.1.0.9/com.ibm.ztpf-ztpfdf.doc_put.09/gtps5/s5hand1.html?cp=SSB23S_1.1.0.9%2F0-1-8-2-2-0&lang=en Note:-To check SSL protocols that are supported by a server/domain, use the utility #openssl Poodle Connection using SSLv3 is not secure. Vulnerability associated with SSLv3 is called poodle. SSL protocol 3.0 makes use of CBC-mode ciphers that allow for man-in-the-middle attacks using padding-oracle stacks. These attacks target the CBC ciphers to retrieve plain-text output from otherwise encrypted information. All the connections via SSlv3 for all the services need to be disabled. Below show the steps to disable this and how to verify that this is disabled. Open apache configuration and change the “SSLProtocol” directive as below. [root@server]# grep SSLProtocol /etc/httpd/conf/httpd.conf ; grep SSLProtocol /etc/httpd/conf.d/ssl.conf SSLProtocol ALL -SSLv2 -SSLv3 SSLProtocol all -SSLv2 -SSLv3 [root@server]# Above will support all the protocols except SSlv2 abd SSLv3. It is possible to check the protocols that are open using openssl command line utility. Previously, before applying this, openssl was able to connect as below. ~]# openssl s_client -connect domain.com:443 -ssl3 CONNECTED(00000003) depth=0 C = --, ST = SomeState, L = SomeCity, O = SomeOrganization, OU = SomeOrganizationalUnit, CN = techmesrv.tk, emailAddress = [email protected] verify error:num=18:self signed certificate verify return:1 depth=0 C = --, ST = SomeState, L = SomeCity, O = SomeOrganization, OU = SomeOrganizationalUnit, CN = domain.com, emailAddress = [email protected] After this is applied, the output is like ~]# openssl s_client -connect domain.com:443 -ssl2 CONNECTED(00000003) 139716123162440:error:1407F0E5:SSL routines:SSL2_WRITE:ssl handshake failure:s2_pkt.c:429: --- no peer certificate available --- No client certificate CA names sent --- SSL handshake has read 0 bytes and written 48 bytes ~]# openssl s_client -connect domain.com:443 -ssl3 CONNECTED(00000003) 140620373813064:error:14094410:SSL routines:SSL3_READ_BYTES:sslv3 alert handshake failure:s3_pkt.c:1257:SSL alert number 40 140620373813064:error:1409E0E5:SSL routines:SSL3_WRITE_BYTES:ssl handshake failure:s3_pkt.c:596: --- no peer certificate available --- No client certificate CA names sent --- SSL handshake has read 7 bytes and written 0 bytes --- New, (NONE), Cipher is (NONE) Secure Renegotiation IS NOT supported Note: Protocols supported:- -ssl2 - just use SSLv2 -ssl3 - just use SSLv3 -tls1_2 - just use TLSv1.2 -tls1_1 - just use TLSv1.1 -tls1 - just use TLSv1 -dtls1 - just use DTLSv1 |
|
0 Comments
For Wildcard SSL, you can install SSL for each domain and subdomain using single certificate. Here, the main domain need to have a dedicate IP.Follow the steps below, to create CSR, and proceed with installation.
1. Generate the Certificate Signing Request (CSR) in WHM, using *.domain.com 2. Send the CSR and private key generated to ssl provider. 3. With the certificate, private key. , go to install SSL certificate for the domain, put the domain as *.domain.com. Put the user as nobody and install. 4. For Subdomain, change the SSL hostname from *.domain.com to the target subdomain and proceed with the installation. Done SNI-: Providing separate SSL certificates for each site. For cPanel versions upto 11.38 separate IP addresses was required to install SSL for each domain. The process has recently been simplified through the use of Server Name Indication (SNI), which sends a site visitor the certificate that matches the requested server name.
How to install SSL for addon domain, which is not possible using WHM. Open apache configuration file and add the below config file, =-=-=--=-==-=-=-=-=--==-=-=--==--=-=-==-=--=-==-=-=-=-=-=-=-=-=-=-=-=-=-=- <IfModule mod_ssl.c> <VirtualHost <IP>:443> ServerAdmin <mail ID> --> Provide the email ID ServerName <domain.com> --> Provide the domain name. DocumentRoot </var/www> --> Location of the document root. SSLEngine on SSLCertificateFile </etc/apache2/ssl/example.com/apache.crt> -->Location of certificate file. SSLCertificateKeyFile /etc/apache2/ssl/example.com/apache.key --> Location of private key. </VirtualHost> </IfModule> =--==-=-=-=-=-=-=-=--==--==-=-=-=-=--==-=-=-=-=-=-=-=-=--==-=-=-=-=-=-=-=-=- Now check SSL is installed from the link, URL : http://www.sslshopper.com/ssl-checker.html To do this SSL need to be installed for server first,
1. Install mod_ssl. You can install using yum, -==-=-=-=-=-=- yum install mod_ssl -=-=-=-=--=-= 2. mkdir /etc/httpd/ssl 3. To create a self signed certificate, execute the below command, =-=-=-=-=-=- openssl req -x509 -nodes -days 365 -newkey rsa:2048 -keyout /etc/httpd/ssl/apache.key -out /etc/httpd/ssl/apache.crt >> Provide the details. ===-=-=-=--= Find the usage of options below, -x509 output a x509 structure instead of a cert. req. -nodes don't encrypt the output key -days number of days a certificate generated by -x509 is valid for. -newkey rsa:bits generate a new RSA key of 'bits' in size -keyout arg file to send the key to -out arg output file -noout do not output REQ -text text form of request -in arg input file 4. vi /etc/httpd/conf.d/ssl.conf Under <VirtualHost _default_:443> ServerName <Name Of Server>:443 SSLEngine on SSLCertificateFile /etc/httpd/ssl/apache.crt SSLCertificateKeyFile /etc/httpd/ssl/apache.key 7. Open apache conf file and add the below in the virtual host =--==-=-=- SSLEngine on SSLCertificateFile /etc/httpd/ssl/apache.crt SSLCertificateKeyFile /etc/httpd/ssl/apache.key =--==-=-=-=- 8. Now restart the apache service. To install SSL for a domain, Just follow the same steps, =-=-=-=- openssl req -x509 -nodes -days 365 -newkey rsa:2048 -keyout /etc/httpd/ssl/<domain>.key -out /etc/httpd/ssl/<domain>.crt =-=--=-=-= Note: To install SSL dedicated IP is required. Under <VirtualHost <Dedicated IP>:443> SSLEngine on SSLCertificateFile /etc/httpd/ssl/<domain>.crt SSLCertificateKeyFile /etc/httpd/ssl/<domain>.key You can verify SSL is installed from URL: http://www.sslshopper.com/ssl-checker "WHM Home » SSL/TLS » Install an SSL Certificate on a Domain" -> To install SSL for a domain. Type nobody" as
Sometime OpenSSL command line is used to create CSR in servers without control panel. You can use the below command to create CSR with 1024 Bits size,
-==- openssl req -new -nodes -newkey rsa:1024 -keyout username.key -out username.csr req - > PKCS#10 X.509 Certificate Signing Request (CSR) Management. Request for a CSR -new -> new request. -nodes -> don't encrypt private keys -newkey rsa:bits -> generate a new RSA key of 'bits' in size -keyout -> Where to send the key to -out arg -> output file General other command line options, =-=-=- -inform arg input format - DER or PEM -outform arg output format - DER or PEM -in arg input file -out arg output file -text text form of request -pubkey output public key -noout do not output REQ -verify verify signature on REQ -modulus RSA modulus -nodes don't encrypt the output key -engine e use engine e, possibly a hardware device -subject output the request's subject -passin private key password source -key file use the private key contained in file -keyform arg key file format -keyout arg file to send the key to -rand file:file:... load the file (or the files in the directory) into the random number generator -newkey rsa:bits generate a new RSA key of 'bits' in size -newkey dsa:file generate a new DSA key, parameters taken from CA in 'file' -newkey ec:file generate a new EC key, parameters taken from CA in 'file' -[digest] Digest to sign with (md5, sha1, md2, mdc2, md4) -config file request template file. -subj arg set or modify request subject -multivalue-rdn enable support for multivalued RDNs -new new request. -batch do not ask anything during request generation -x509 output a x509 structure instead of a cert. req. -days number of days a certificate generated by -x509 is valid for. -set_serial serial number to use for a certificate generated by -x509. -newhdr output "NEW" in the header lines -asn1-kludge Output the 'request' in a format that is wrong but some CA's have been reported as requiring -extensions .. specify certificate extension section (override value in config file) -reqexts .. specify request extension section (override value in config file) -utf8 input characters are UTF8 (default ASCII) -nameopt arg - various certificate name options -reqopt arg - various request text options -==- Done =-=-=- When cPanel users complain and receive the email as cPanel certificate will expire in x days, follow the below steps to renew the certificate,
=-==-=-=- WHM login >> Main >> Service Configuration >> Manage Service SSL Certificates >> Reset Certificate -==-=-=-= If you have purchased SSL for server name, renew the SSL from SSL provider. Renewing via cPanel will reset the existing SSL certificate. Done |
AuthorWrite something about yourself. No need to be fancy, just an overview. Archives
July 2015
Categories |

 RSS Feed
